
Home > The Virtuoso Pianist > Part I > Hanon Exercise 2 in C
Piano technique exercise N°2 in C
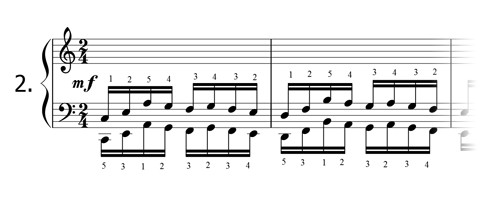
60bpm, 2 repeats
Hanon Educational Materials
You may promote Hanon exercises by printing and sharing the PDFs
Download the free piano sheet music
The Virtuoso Pianist by C. L. HANON
Part 1 transposed in all keys
PDF Format - 283 pages - 240 Piano exercises


Hanon Play-Along Recording
The Virtuoso Pianist - Part 1
Piano technique exercises 1 to 20

Notes by C. L. Hanon :
- Special exercise for the 3rd and 4th fingers of the hand.
- The 4th and 5th fingers being naturally weak, it should be observed that this exercise, and those following it up to Exercise N°20, are intended to render them as strong and agile as the 2nd and 3rd.
- For each Key : When this exercise is mastered, repeat the preceding one, and play both together four times without interruption; the fingers will gain considerably by practising these exercises, and those following, in this way.
How to practice piano more effectively :
- Practice each hand separately first.
- Practice this exercise slowly in the beginning (metronome on 60). If you played it easily, and precisely with the metronome, move the tempo up one notch. Continue to practice in this way until you reach 108 bpm.
- Try to practice Hanon Exercise N°2 in the other keys, starting with the white keys (C, D, E, F, G, A, and B) and then going to the black keys (D-flat, E-flat, G-flat, A-flat, and B-flat). You can also transpose Hanon exercises within the cycle of fifths. The fingering remains constant in all keys.
- Practice with various dynamics. Practice soft, loud and everything in between.
- As you practice, vary the touch. Play staccato, play legato, and play two-note slurs.
- Practice in different rhythms.
- And as Charles-Louis Hanon recommends it, practice the exercises by lifting the fingers high and with precision, playing each note very distinctly.
We hope the above tips will help make your piano practice more efficient.


David (Wednesday, 18 May 2016 16:02)
I have a question regarding this exercise. How come in the left hand part, it is the finger number 3 and not number 4 that plays the second note ? Seems easier to me. Thank you for your answer.
Marco Ricciardi (Monday, 20 March 2017 10:16)
Addressing David's question.
I tell my students to use finger 4 as you suggested. Not because it's easier which would defeat the purpose of the exercise as they were designed to make you move your fingers in as many different combinations as possible and not as in the easiest way as possible.
But coming back to matter in hand, if you look at the left hand fingering suggestion you'll see that finger 3 is used 3 times while finger 4 only 1. considering that the exercise was developed to address fingers 4 and 3, I don't see why you shouldn't split the four notes by using finger 4 and 3 twice each.
panui (Saturday, 10 March 2018 01:08)
I disagree. The jumps for both hands are done between fingers 1 and 2. This assures a smooth ascend. The aim is to train fingers 3 and 4, not making 5 and 4 jump. Of course you may do the jump with finger 4 but i find it might have an impact on how fluid you play this at higher speeds and any deviation will impact the other hand as well.
Mohammd zarei (Saturday, 12 September 2020 17:22)
Thanks for all materials in this website. They are really helpful